15th-Oct-24, 03:37 PM
Thanks Anthony and thank you very much Chris for that excellent help re fixing the mounts.
I have only just seen it but have printed it off for future reference.
I remembered I had a few different size magnets and decided to try and use those as I wanted the boot to open.
I very patiently scribed around the mould lines of the boot, once I got through most of it apart from the two sides.
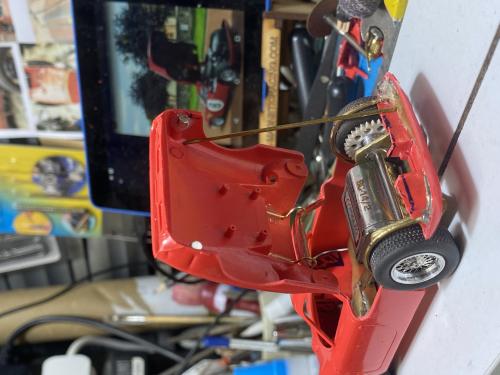
I made a hinge out of brass tube and rod.
I got this idea off Doug Whyte of Model Car Muse, this guy has a youtube channel and he is a wonderful model maker.


I then glued the brass tube with some quality super glue that Dave Diamond who is a on a scratch build facebook page I follow recommended (not sure if he's on here) then added loads of araldite to it once dry.

You can also see in the above pic where I glued the button magnets.
The model kit had small plastic male female fixings here, which I dremeled out and glued a magnet top and bottom in each corner.
I don't think I need to add the fixings I asked advice about now as these magnets snap in quite strongly.
Next step was to carefully scribe the remainder of the mould lines and the boot is separated from the rest of the body.


Next fixing to add is at the front, I'll probably ad magnets also so there's no fixing's visible underneath, because there's going to be some mesh added and its a nice looking front end. I don't want screws under there if possible.
Here's a little video of it closing, as you can see the magnets are nice and strong as they popped the front end up.
https://youtube.com/shorts/DqAX-iSmMr8?s...FIzeBIXX4U
I've got a 3D printed motor coming from a friend who I met on a model site.
This will get installed in the back, hence why I've made the hinged boot.
Thanks for looking.
I have only just seen it but have printed it off for future reference.
I remembered I had a few different size magnets and decided to try and use those as I wanted the boot to open.
I very patiently scribed around the mould lines of the boot, once I got through most of it apart from the two sides.
I made a hinge out of brass tube and rod.
I got this idea off Doug Whyte of Model Car Muse, this guy has a youtube channel and he is a wonderful model maker.
I then glued the brass tube with some quality super glue that Dave Diamond who is a on a scratch build facebook page I follow recommended (not sure if he's on here) then added loads of araldite to it once dry.
You can also see in the above pic where I glued the button magnets.
The model kit had small plastic male female fixings here, which I dremeled out and glued a magnet top and bottom in each corner.
I don't think I need to add the fixings I asked advice about now as these magnets snap in quite strongly.
Next step was to carefully scribe the remainder of the mould lines and the boot is separated from the rest of the body.
Next fixing to add is at the front, I'll probably ad magnets also so there's no fixing's visible underneath, because there's going to be some mesh added and its a nice looking front end. I don't want screws under there if possible.
Here's a little video of it closing, as you can see the magnets are nice and strong as they popped the front end up.
https://youtube.com/shorts/DqAX-iSmMr8?s...FIzeBIXX4U
I've got a 3D printed motor coming from a friend who I met on a model site.
This will get installed in the back, hence why I've made the hinged boot.
Thanks for looking.

![[+]](https://slotracer.online/community/images/bootbb/collapse_collapsed.png)


 )
)