

5th-May-20, 11:23 AM
Only little bit done today.
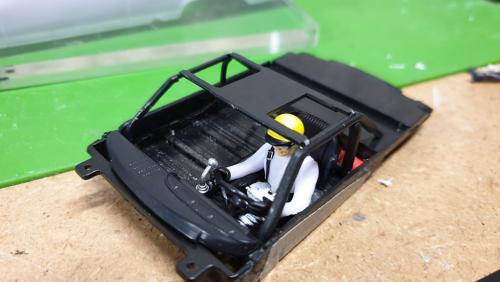
Finished Interior 2, and as it was black, stippled/dry brushed the floor with silver to give some variation.
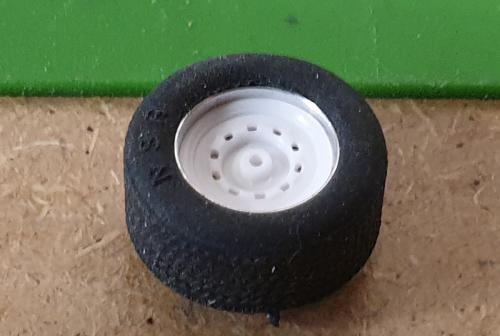
I was looking at what inserts to use to best replicate the steel wheels these cars ran in NASCAR and the ones used on the Policar Ferrari P4 looked similar, but not deep enough. As luck would have it they fit neatly inside an NSR 15.8 wheel, so a few minutes with a 3.5mm drill by hand to deepen/open out the hole fixing meant they could sit deeper. After the insert and wheel are painted I feel they will be a fair representation.
That left me some time to prep and prime the bodies.
Painting is the bit I get most nervous at, as there are a multitude of things that can happen to set you back !
It's been a while since I did any, and in the past I have found a method that usually works out for me.
I am not saying its the best way, or the easiest, but its what I know so I will share it and you can draw your own conclusions
I use acylic auto paints as I: 1. don't have the skill to set up an airbrush. And 2. can't be bothered with having to clean said airbrush !
1. Fill sink bowl with warm water and a dash of fairy liquid.
2.Immerse body (and parts if any) in water and rub (or "key") the body/parts with 800 or 1000 grade wet and dry paper. (I actually used 2000 this time as that's all I had).
3. rinse under warm or mildly hot water and shake and pat dry with kitchen towel.
4. Place body on something to hold it steady and allow full access to all areas that need painting. I use an old CD "cakebox" base with spindle, a good sized blob of blu-tack on the spindle and press the body on (at the roof) so its firmly attached. Use kitchen towel to avoid touching with you fingers as this can leave body oils behind which can react with paint.
I also have an old pespex box lid that I place over the body and CD base to lower the risk of dust getting on. (Carrera ones are the best as they are biggest).
5. Warm oven to 50 deg C using separate temp gauge as oven may not be accurate or marked that low.
Place cakebox/lid/body assembly in the oven for 5 mins, in the meantime place spray can stood upright in a bowl of hot water, for a few mins, and remove and give a good shake.
6.Remove body from oven take too spray area, remove "lid" and spray a couple of light dustings of plastic primer all over from 5 directions, then one light solid coat.
7. Carefully place Perspex lid back over the base and body and return to oven for a few mins.
8.Move to airing cupboard and tell family not to go in there for the next 12 hours
Repeat steps 5 to 8 for the colour coats. Some people will then clear laquer the body before decaling, I don't usually but will try it this time as it can apparently help make the transparent film on decals less noticeable.
Once dry, decal car and allow to dry and repeat steps 5 to 8 for clear acrylic laquer.
Some people use Kleer/Johnsons floor polish as a protection instead, just whatever you prefer, but that doesn't need the oven method as its pretty fast drying.
I usually use acrylic laquer but some decals can react with it.
I recently had a painted car that came with separate decals (licensing issues probably as it wasn't fags or booze) and as I didn't want to risk reaction or taking apart the body, I used a fine sable brush and "Kleer" to protect them.
Finished Interior 2, and as it was black, stippled/dry brushed the floor with silver to give some variation.
I was looking at what inserts to use to best replicate the steel wheels these cars ran in NASCAR and the ones used on the Policar Ferrari P4 looked similar, but not deep enough. As luck would have it they fit neatly inside an NSR 15.8 wheel, so a few minutes with a 3.5mm drill by hand to deepen/open out the hole fixing meant they could sit deeper. After the insert and wheel are painted I feel they will be a fair representation.
That left me some time to prep and prime the bodies.
Painting is the bit I get most nervous at, as there are a multitude of things that can happen to set you back !
It's been a while since I did any, and in the past I have found a method that usually works out for me.
I am not saying its the best way, or the easiest, but its what I know so I will share it and you can draw your own conclusions
I use acylic auto paints as I: 1. don't have the skill to set up an airbrush. And 2. can't be bothered with having to clean said airbrush !
1. Fill sink bowl with warm water and a dash of fairy liquid.
2.Immerse body (and parts if any) in water and rub (or "key") the body/parts with 800 or 1000 grade wet and dry paper. (I actually used 2000 this time as that's all I had).
3. rinse under warm or mildly hot water and shake and pat dry with kitchen towel.
4. Place body on something to hold it steady and allow full access to all areas that need painting. I use an old CD "cakebox" base with spindle, a good sized blob of blu-tack on the spindle and press the body on (at the roof) so its firmly attached. Use kitchen towel to avoid touching with you fingers as this can leave body oils behind which can react with paint.
I also have an old pespex box lid that I place over the body and CD base to lower the risk of dust getting on. (Carrera ones are the best as they are biggest).
5. Warm oven to 50 deg C using separate temp gauge as oven may not be accurate or marked that low.
Place cakebox/lid/body assembly in the oven for 5 mins, in the meantime place spray can stood upright in a bowl of hot water, for a few mins, and remove and give a good shake.
6.Remove body from oven take too spray area, remove "lid" and spray a couple of light dustings of plastic primer all over from 5 directions, then one light solid coat.
7. Carefully place Perspex lid back over the base and body and return to oven for a few mins.
8.Move to airing cupboard and tell family not to go in there for the next 12 hours
Repeat steps 5 to 8 for the colour coats. Some people will then clear laquer the body before decaling, I don't usually but will try it this time as it can apparently help make the transparent film on decals less noticeable.
Once dry, decal car and allow to dry and repeat steps 5 to 8 for clear acrylic laquer.
Some people use Kleer/Johnsons floor polish as a protection instead, just whatever you prefer, but that doesn't need the oven method as its pretty fast drying.
I usually use acrylic laquer but some decals can react with it.
I recently had a painted car that came with separate decals (licensing issues probably as it wasn't fags or booze) and as I didn't want to risk reaction or taking apart the body, I used a fine sable brush and "Kleer" to protect them.
![[+]](https://slotracer.online/community/images/bootbb/collapse_collapsed.png)