Posts: 269
Threads: 31
Likes Received: 725 in 199 posts
Likes Given: 232
Joined: Apr 2019
Location London, UK
Time will tell how the Aston stands up to club racing at 0.8mm, there is a particular weak area around the rear arches in front of the the vent cut outs where the section is a shallow radius 8mm x 0.8mm either side and the vent cut out section is not much better where it overlaps the interior cut out. I have added a rib section running from the doors past this point to the rear hatch on either side which, with front ribs added under the bonnet will be in the next print.
Cheers
John
Mr Fit for Function.
Posts: 4,520
Threads: 147
Likes Received: 3,063 in 1,818 posts
Likes Given: 4,204
Joined: Apr 2019
Location Isle of Man
When I raced 1/12th R/C cars I used to smear ShoeGoo inside the lexan bodyshells around wheelarches and the front end, it does a great job of reinforcing.
Life is like a box of Slot cars...


![[+]](https://slotracer.online/community/images/bootbb/collapse_collapsed.png) •
•
Posts: 556
Threads: 32
Likes Received: 818 in 363 posts
Likes Given: 197
Joined: Dec 2020
Location burnley UK
John , looking at your body prints , it looks like they have been printed vertically ?
is this the case ? i was wondering if this is the case , what support and bed adhesion settings are you using and , if you are using any slight vertical angle
especially with regard to the wheel wells and cockpit openings
i normally print horizontally , which although creates arguably stronger bodies , always leaves a lot of work removing layer lines especially the last few on a flat (ish) plane
btw i printed your Allen key tool the other day , apart from some slight elephant foot trimming (which is due to my machine), it otherwise fit together like a glove , just an FYI , nice work

Kev
Posts: 269
Threads: 31
Likes Received: 725 in 199 posts
Likes Given: 232
Joined: Apr 2019
Location London, UK
Kev,
Correct printed vertically, and as you stated less hassle on the clean up. I draw the support structure for each shell based on some common parts like
I beams and cones as below. The support structure is anchored to a 1mm thick plate to ensure it doesn't lift its skirts and float round the bed.


I cut the back off the shell off and print that separately to avoid having remove (and clean up) a lot of support from an external face and give the major section a flat side to work from as shown.
This is the DBR 1 (grey) , new ribs and posts (red) supports (blue).
Printed using the Esun PLA ST filament which is stronger and a bit more flexible than standard PLA using following settings on a CR10 Mini (forerunner to the Ender 3)
0.1mm layer
Bed temp 62 C
Nozzle 204 C
Speed 60 mm/s except outer wall at 40 mm/s
Support & bed adhesion set to none.
Print time 8 hours.
Cheers
John
P.S. As stated else where, I firmly believe in Fit for Function.
Mr Fit for Function.
Posts: 556
Threads: 32
Likes Received: 818 in 363 posts
Likes Given: 197
Joined: Dec 2020
Location burnley UK
excellent explanation , and well thought out idea ,
guess what my next little project is
after Gaydon of course

Posts: 195
Threads: 5
Likes Received: 246 in 119 posts
Likes Given: 555
Joined: Dec 2021
Location MN, USA
Yup, the old "slice off the rear end and glue it back on later" trick.
You are correct though, vertical printing does help as well as the brim.
All of these bodies are weak in front of the rear arches. A smear of white glue helps, or thin CYA if you have it. Interesting enough, the painting process also helps - a couple layers of primer and a couple color layers helps.
I have two DBR1 files, that one is decent though. I modify most files the same way (remove hooks, guide sweep, remove rear end weight, open vents, etc).
Looking forward to seeing your build and results.
•
Posts: 269
Threads: 31
Likes Received: 725 in 199 posts
Likes Given: 232
Joined: Apr 2019
Location London, UK
I have the chassis tucked under now with running gear for the DBR1 plus the interior in position so I could check the fit and set up the suspension, axle heights , guide height etc and give it a run. Pleased with the result even with the interior fitted still only 11 grms for the body shell and with the allowed Flat 6S motor flies around my home track.
Haven't taken any more pics yet as I will print another shell & interior with all the improvements (ribs, shown in red in my last post) the 1st set has highlighted.
On that subject I used Cura to get the following picture.
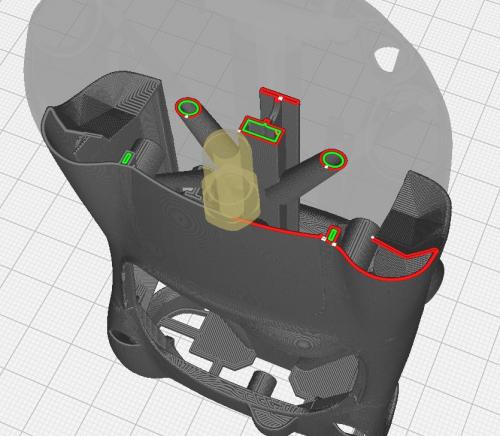
Can be seen that the bonnet (and other areas) are only one 0.4mm layer thick as Cura was showing only one pass. I went back into CAD sectioned the bonnet (hood) and found that the section thickness was actually 0.52mm which explains firstly why it feels flimsy and secondly a 1/3 lighter compared to the Cobra which 0.9-1.0mm thick. Decided to leave this as is, and apart from the ribs around the rear arches and the bonnet area, just thicken up the detached rear by shrinking and cut and pasting a 2nd part inside the 1st, as this was see through and ripe for a rear ender that would wreck it.
Cheers
John
Mr Fit for Function.
Posts: 4,520
Threads: 147
Likes Received: 3,063 in 1,818 posts
Likes Given: 4,204
Joined: Apr 2019
Location Isle of Man
That's a grand idea actually. I haven't printed a body by FDM for nearly two years and a strong support structure is something I'd like to try too.
That's the idea of the week for me
Life is like a box of Slot cars...
•
Posts: 269
Threads: 31
Likes Received: 725 in 199 posts
Likes Given: 232
Joined: Apr 2019
Location London, UK
Another of those winter projects.
Friend of mine wanted a slot version of the NASCAR truck, so he bought a resin shell off the Net and then asked me to create a chassis for it. However when the shell turned up was not happy with the overall look, so I borrowed the shell and from various pictures off the Net created my own shell from scratch.
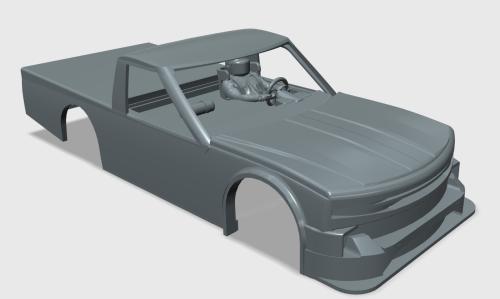
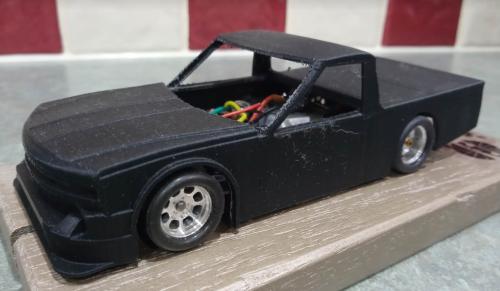
Added an interior from my driver templates and once the design was completed and the weather warmed up I printed off the shell and an inline chassis to suit.
Trial fit of the shell on its chassis with a mean and predatory vibe going on.
Cheers
John
Mr Fit for Function.
Posts: 556
Threads: 32
Likes Received: 818 in 363 posts
Likes Given: 197
Joined: Dec 2020
Location burnley UK
been looking for something like this for a while now
but everything i see on the various 3dp platforms don't do the series justice
always wondered why none of the main stream manufacturers don't make these
especially for the US market
would also make a great class for clubs and collectors alike
well done James you have hit another sweet spot imo
Kev
•



