Posts: 27
Threads: 3
Likes Received: 115 in 24 posts
Likes Given: 89
Joined: Nov 2021
Location St-Etienne, France
Some small advances, still on this part of the track
Once the landscape is done, I paint the different areas to work with :
![[Image: p1110077-2-58bf066.jpg]](http://img.xooimage.com/files113/0/b/f/p1110077-2-58bf066.jpg)
I will use the same products I used on my previous track :
![[Image: p1110080-2-58bf068.jpg]](http://img.xooimage.com/files115/6/1/9/p1110080-2-58bf068.jpg)
As the black is not perfectly dried, I begin with the brown area :
![[Image: p1110082-2-58bf074.jpg]](http://img.xooimage.com/files112/c/b/5/p1110082-2-58bf074.jpg)
Then, 3 coats from dark to light grey are dry brushed on the black areas :
![[Image: p1110084-2-58bf07c.jpg]](http://img114.xooimage.com/files/6/0/8/p1110084-2-58bf07c.jpg)
![[Image: p1110086-2-58bf07e.jpg]](http://img115.xooimage.com/files/2/2/b/p1110086-2-58bf07e.jpg)
Will see tomorrow if a forth coat is needed
Then, I will have to treat the green areas
To be continued ...
Posts: 27
Threads: 3
Likes Received: 115 in 24 posts
Likes Given: 89
Joined: Nov 2021
Location St-Etienne, France
I'm finalizing the green parts of this area :
![[Image: p1110089-2-58bfd15.jpg]](http://img.xooimage.com/files115/d/8/c/p1110089-2-58bfd15.jpg)
![[Image: p1110091-2-58bfd17.jpg]](http://img.xooimage.com/files111/a/6/3/p1110091-2-58bfd17.jpg)
I use wood glue and water :
- 60%-40%, applied with a brush for the first coat
- 40%-60% and a fex drops of dish soap, applied with a pipette for the following ones
Can't wait to see the result once every thing will be perfectly dry

Posts: 1,883
Threads: 170
Likes Received: 2,310 in 914 posts
Likes Given: 2,247
Joined: Mar 2019
Location Overijse, Belgium
Watching with interest - reaally nice job!!! Keep the pics coming please :)
Posts: 27
Threads: 3
Likes Received: 115 in 24 posts
Likes Given: 89
Joined: Nov 2021
Location St-Etienne, France
Many thanks

Once dried, I had to add some patches here and there. I also tried to weathered the concrete walls
Here is the result :
![[Image: p1110109-2-58c0be8.jpg]](http://img.xooimage.com/files113/3/5/3/p1110109-2-58c0be8.jpg)
![[Image: p1110104-2-58c0bea.jpg]](http://img.xooimage.com/files113/1/9/7/p1110104-2-58c0bea.jpg)
Posts: 37
Threads: 6
Likes Received: 54 in 21 posts
Likes Given: 101
Joined: May 2020
really nice build, i am wondering how do you find the policar track, I have scalextric sport and seems to be getting harder work to maintain connections the longer time goes on, especially with digital.
I am in two minds wether to create a routed track or start again with policar?
(This post was last modified: 15th-Jan-22, 06:47 PM by
roguejackal.)
![[+]](https://slotracer.online/community/images/bootbb/collapse_collapsed.png) •
•
Posts: 27
Threads: 3
Likes Received: 115 in 24 posts
Likes Given: 89
Joined: Nov 2021
Location St-Etienne, France
Thank you for your comment

I have to say that I'm very happy with my Policar track
Not as easy to assemble than Ninco or Scalex Classic track, but a better electric continuity, probably the best one provided by any plastic track brands

However, a well built wood track with braids will always be better than any plastic track, just my 2 cents

Posts: 27
Threads: 3
Likes Received: 115 in 24 posts
Likes Given: 89
Joined: Nov 2021
Location St-Etienne, France
I began to work on the other side of the bridge
As I decided to choose bricks instead of concretes, I found the following pattern to "build" my walls :
![[Image: mur-03-58cd814.jpg]](http://img.xooimage.com/files114/3/d/b/mur-03-58cd814.jpg)
Here is the result :
- From tunnel entrance :
![[Image: p1110123-58ce3b9.jpg]](http://img.xooimage.com/files114/a/f/4/p1110123-58ce3b9.jpg)
- From the timing bridge :
![[Image: p1110125-58ce3bd.jpg]](http://img.xooimage.com/files112/d/6/9/p1110125-58ce3bd.jpg)
- And the exit of the tunnel :
![[Image: p1110128-58ce3c3.jpg]](http://img.xooimage.com/files113/5/4/c/p1110128-58ce3c3.jpg)
On this last picture, you can see a second TV tower I received a few weeks ago ; it came with a third TV tower and more than 100 people for the pit lane and the stands to come
To be continued ...
Posts: 817
Threads: 45
Likes Received: 2,159 in 653 posts
Likes Given: 2,311
Joined: Apr 2019
Location The Netherlands
Hi Fred,
In combination with the concrete construction the bricks look really good.
Looking forward to see more photos of the promising build process of your scenic racetrack.
Hub

(This post was last modified: 6th-Feb-22, 09:44 AM by
rallyhub.)
Posts: 27
Threads: 3
Likes Received: 115 in 24 posts
Likes Given: 89
Joined: Nov 2021
Location St-Etienne, France
Hello everybody

More than 6 months since the last update

, so I decided to use the last days of my summer holidays to work on the track, the part between the timing gantry and the bridge
Here is the result :
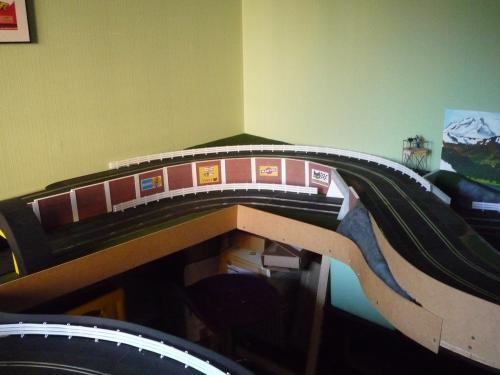

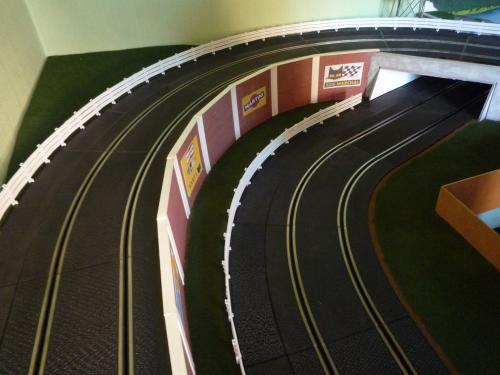
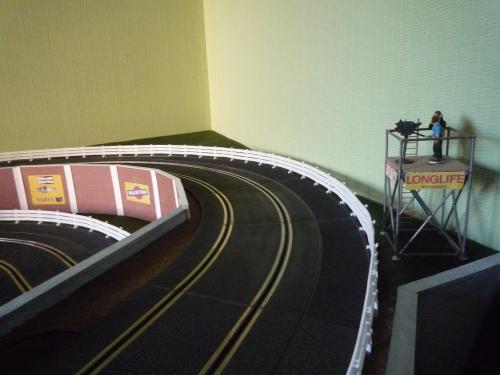

I'm quite happy with the result, but there is stil a lot to do

... hoping next update before Christmas

Regards,
Fred
Posts: 27
Threads: 3
Likes Received: 115 in 24 posts
Likes Given: 89
Joined: Nov 2021
Location St-Etienne, France
Hello

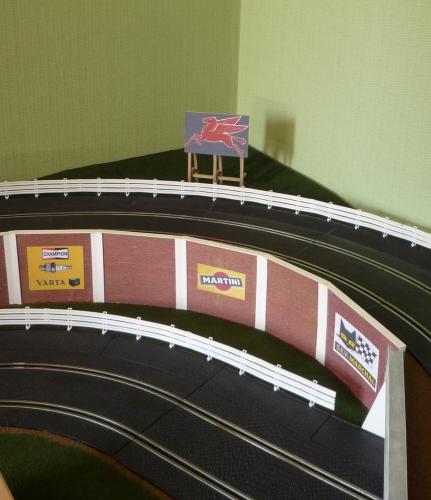
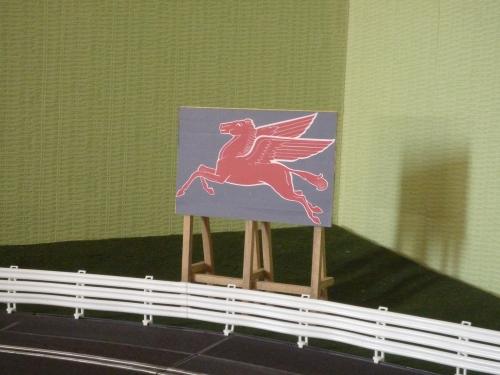
Had to add something on the hill outside the largest curve of the track
So I decided to build a billboard out of balsa wood weathered with a light grey juice
I chose the Pegasus because my father's first job was for ExxonMobil
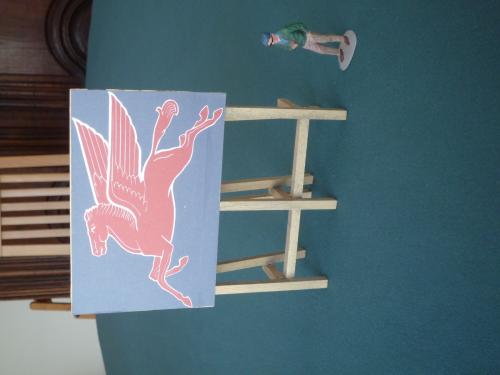

Regards,
Fred
(This post was last modified: 30th-Aug-22, 10:26 AM by
Fred.)
![[Image: p1110077-2-58bf066.jpg]](http://img.xooimage.com/files113/0/b/f/p1110077-2-58bf066.jpg)
![[Image: p1110080-2-58bf068.jpg]](http://img.xooimage.com/files115/6/1/9/p1110080-2-58bf068.jpg)
![[Image: p1110082-2-58bf074.jpg]](http://img.xooimage.com/files112/c/b/5/p1110082-2-58bf074.jpg)
![[Image: p1110084-2-58bf07c.jpg]](http://img114.xooimage.com/files/6/0/8/p1110084-2-58bf07c.jpg)
![[Image: p1110086-2-58bf07e.jpg]](http://img115.xooimage.com/files/2/2/b/p1110086-2-58bf07e.jpg)

![[+]](https://slotracer.online/community/images/bootbb/collapse_collapsed.png)
![[Image: p1110089-2-58bfd15.jpg]](http://img.xooimage.com/files115/d/8/c/p1110089-2-58bfd15.jpg)
![[Image: p1110091-2-58bfd17.jpg]](http://img.xooimage.com/files111/a/6/3/p1110091-2-58bfd17.jpg)


![[Image: p1110109-2-58c0be8.jpg]](http://img.xooimage.com/files113/3/5/3/p1110109-2-58c0be8.jpg)
![[Image: p1110104-2-58c0bea.jpg]](http://img.xooimage.com/files113/1/9/7/p1110104-2-58c0bea.jpg)


![[Image: mur-03-58cd814.jpg]](http://img.xooimage.com/files114/3/d/b/mur-03-58cd814.jpg)
![[Image: p1110123-58ce3b9.jpg]](http://img.xooimage.com/files114/a/f/4/p1110123-58ce3b9.jpg)
![[Image: p1110125-58ce3bd.jpg]](http://img.xooimage.com/files112/d/6/9/p1110125-58ce3bd.jpg)
![[Image: p1110128-58ce3c3.jpg]](http://img.xooimage.com/files113/5/4/c/p1110128-58ce3c3.jpg)

 ... hoping next update before Christmas