Thread Rating:
  • 0 Vote(s) - 0 Average
  • 1
  • 2
  • 3
  • 4
  • 5

Mediterranean-themed single-lane hillclimb / rally-stage
#11

(25th-Mar-21, 02:15 PM)BARacer Wrote:  It sounds like you have enough source material in your head, but here are some pages from a book of climbs for cyclist featuring two hills in the region

You need to have the right trees, and the right details of those little parapet walls, the road markings... Cool

Yep, there are a lot of details to consider and plenty of choices from across the region. One major constraint will be how far my skills will stretch. Thankfully there are a lot of photos and video online - and I have found cycling pics a good source. Plus there's not much the model railways community hasn't been able to recreate in various scales. I shall be trawling that knowledge-base extensively.
Quote
#12

Great Idea Andy!

Yes, I blame RallyHub too!

Regards, Lloyd.
[+] 2 members Like Lloyd.L's post
Quote
#13

Talking of source material... the Sanremo rally takes place in two weeks time. It looks like most of the action will be streamed live by Primocanale and a preview run through every stage (plus extras used in the historic rally) are available in a playlist on the Primocanale YouTube channel here: https://youtube.com/playlist?list=PLde00...S5gm3l6LfU

Here’s a flavour...


That is pretty useful research material  Thumbup
[+] 3 members Like woodcote's post
Quote
#14

(25th-Mar-21, 06:25 PM)woodcote Wrote:  One major constraint will be how far my skills will stretch.

Even if your skills are only a small part of your enthusiasm, the result will certainly still be great.

rallyhub Thumbup
[+] 2 members Like rallyhub's post
Quote
#15

I am safely in my comfort zone at the moment - wiring, electronics and benchwork  Sun

My plan for this week was to continue testing the track as it is, with all the wiring for the automatic polarity changes complete...


To help with that, I soldered wires to the second dead strip on the upper loop and hooked that up to an Arduino Uno clone so I can use Race Coordinator to time the runs (see here for how I did it). I have commandeered a drawer just below the dead strip to house the electronics...


And it is all working very nicely...


Times for the run down and up the hill (a 'lap') are now just under 8 seconds, plummeting from the original 10 seconds when I was using the manual DPDT switch and from just over 9 when I had the relay board with an automatic sensor at the top and manual button for the bottom loop. I can now concentrate fully on driving - and having very little run-off does force me to keep things neat. Those fast times are with a race-prepared Ninco Lancia 037, which is very well suited to the layout.

In terms of more wiring, I will add start lights operated by the Arduino to sit next to the start line. I have a little 5-segment LED bar on its way from China - plus a tiny 34 x 16 x 24mm black plastic enclosure which will be to scale, if not entirely in keeping with the 70s, 80s & 90s theme. A start line / time control scene replaces the planned service area on the diagram in the opening post - less is more, I think. I have been researching on YouTube what 1980s start line personnel would wear and I quite like this scene...


If I'm going to run the stage competitively - most likely as part of a proxy - I will need a power relay so Race Coordinator can control the power at the start and my reaction time is taken out of the equation. That'll be another relay to squeeze into the controller box...


As I complete the benchwork, I will be soldering jumper wires between every track piece. The connections between single-lane track pieces are not as secure as normal. As I'll be gluing the track down (with silicone sealant) and the scenics will involve embedding the plastic track in the scenery, the conductivity of the entire layout has to be 100% bullet-proof before that happens.

What I'm doing this week is to test the track and tweak the gradients and transitions between the different boards that are acting as the road bed. The benchwork is non-traditional, more of a play on an open-grid bench, but using furniture - plus battens on the walls - as supports. And the removable lower loop will be a single board sitting on home-made trestles. I need a couple of 4x2 sheets of ply before the weekend... the woodcote woodstore was a bit short.

The stage is great fun to drive. What I really like from driving lots of laps is that nothing is level - it's just non-stop elevations, jumps, dips and cambers. I put some foam under the straight between bridge and 'Y' of the upper loop and it gives the impression of a jump. It's the only full-throttle moment on the track and although the cars aren't quite getting airborne, it looks like it. I was worried the Radius 4 'esses' on the hill wouldn't add anything, but I'm glad I didn't go with anything tighter. They look right and are tricky with the narrow single-lane width - quite how tricky will depend on how I build up the extra road surface. And making them the wider & faster R4s adds to the fun of the hairpin...


The hairpin at the bottom of the hill (you can't quite see it in the video) looks great and is a challenge to drive perfectly - in either direction. I will leave the full width of the R1 (removing the rails from the outer lane and filling the slot) so the cars can really swing out. The camber and the drop down is fabulous visually. The rally cars I've tested have all managed it fine - although a few ultra-low and long-wheelbase GT and BTCC race cars are marginal... it is about the technique just to get them round the corner.

I will continue with the testing and - hopefully - get started on finalising and fixing the benchwork at the weekend. I also need to decide on the width of the road bed down the hill and the angle of the hillside below the road...

   
[+] 8 members Like woodcote's post
Quote
#16

There's not a huge amount to show... but progress continues! Quite a lot of the benchwork has been fixed - apart the removable lower loop, which will be the final piece in the jigsaw, maybe not until some of the scenics have been started.

A lot of work and tweaking has gone into the hairpin at the bottom of the hill. The character has changed quite a bit...


The adverse camber is still there, but the slope down in the middle of the corner is less severe. The kick-up from the hairpin is steeper (about 12 cms in 36 cms - or 1:3) and the drop from the exit of the corner to the pit lane 'Y' of the lower loop is more pronounced (10cms in 70 cms - or 1:7), which is the same as the middle section of the hill. The slope from the bridge to the start of the hill (ie the corner past the hillside village) is a gentler 1:20.

Those changes do give a different feel to the hairpin. It's still a challenge, but the initial gradient up the hill makes the climb much more satisfying than it was, even if the drop down within the corner isn't quite so spectacular. I have left a 1 1/2 inch screw in the inside of the corner that can be tightened or loosened to change the characteristic of the drop, until I get it just right.

After viewing more videos of Sanremo, Monte Carlo, Corsica and Antibes, I've cut the roadbed of the hill much tighter to the single-lane track. In terms of driving - it looks quite exhilarating! It also allows for a steep hillside remaining within the limits of the bookcases under the track - and the potential of carrying that hillside down onto the lower loop board, giving continuity in the scenics. Looking at videos of the 80s and early 90s, I have three scenic / protective items to put between the track and the precipice. The first is relatively short pieces of armco...


More substantial blocks of stone wall...


And the black & white wooden stakes / bollards that can be linked with metal rails (brass tube or piano wire in 1/32 scale)...


I'm thinking of using all three - but not overdoing it. The main area cars are dropping over the edge is at the top (the village). I'm still looking at something inspired by this photo, but using more 80s-90s materials, probably the low wall...


I have been looking at figures - spectators are an important feature of the rallies in this region... The events are mostly in the late autumn and winter - so that gives plenty of options. I have some of the fabulous R&R figures (here) and - on Brian's recommendation - picked up 50 Chinese figures for £9.50 (here). Where there are walls and earth banks, it's common for spectators to be sitting down, so I'm also looking at the set of 15 unpainted Preiser figures (here) for my more detailed village scene.

What I did pick up - as well as the bag of Chinese figures - was a box of these 1/32 scale Vespas for a tenner. That was less than the price of one sold individually because the collectors' box was damaged. I shalln't be needing the box....


I shall crack on with getting the hill right, finishing the benchwork and wiring together the track pieces before I start gluing track sections down with silicone sealant. The hill is the important bit to do first. I'll also keep half an eye on the next step - building up the road surface and the daunting task of starting the scenics. I shall be working on one smallish section at a time. The hill and the hairpin will be my focus over the next few weeks.
[+] 5 members Like woodcote's post
Quote
#17

Hi Andy,

It is coming all together now.
Do you still have enough ground clearance at the lower hairpin for cars like for instance a Scalextric Escort MK1?

Hub Thumbup
[+] 1 member Likes rallyhub's post
Quote
#18

Yes, the Scalextric Escorts, Cortinas and Minis are all fine. The only problems I was having were some longer-wheelbase Scalextric cars with low ground clearance - very rarely one would get 'beached' (which can happen even on flat Scalextric track!) or would turn 90-degrees and deslot. Flattening the centre of the 180-degree hairpin seems to have solved that issue for every car. I've spent a lot of time testing a lot of cars as I do want a variety of racing up (and down) the hill - mostly rally cars, but also classic sports cars from the Targa Florio era and any 'Formula Libre' style hill climb cars...

... I think I'm ready to get super-nerdy with dozens of classes so I can build and tune cars for various class records etc - that's what a hill climb is all about Sun
[+] 4 members Like woodcote's post
Quote
#19

Really like how this is going. Looking forward to seeing it progress!
[+] 1 member Likes AdeC's post
Quote
#20

That's a long time since April! Not a huge amount has happened apart from a lot of running and some subsequent tweaking.

A big test was the TR7 proxy, where the hill got some sheets thrown at it for decoration and some quick cars exposing every issue there might be...


Two things that leapt out were:

1) Not enough room between track and bookcase just beyond the hairpin - simply no room for scenery and no 'drifting' space for the cars
2) A big leap over hump (after the bridge) and a fast, light car can miss the deadstrip - and so doesn't trigger the polarity change.

That meant two necessary tweaks:

1) The hairpin is now 180-degrees, rather that 202.5 - so it goes straight, then a R3 and into the 'Y' of the lower loop.
2) I turned the deadstrip 1/2 straight 180-degrees to take the deadstrip to the end furthest from the 'Y' and also inserted a 1/4 straight before it - moving the deadstrip just over 6-inches further back. Of course, I had to re-solder all the power and data cables - but it's worth it.
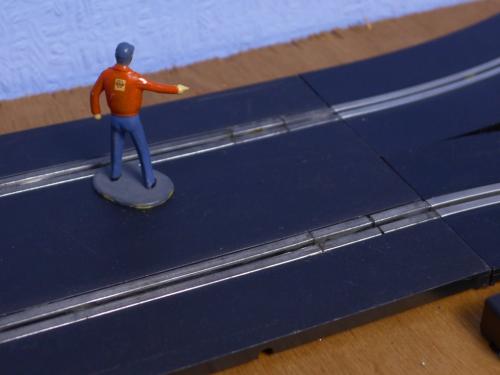
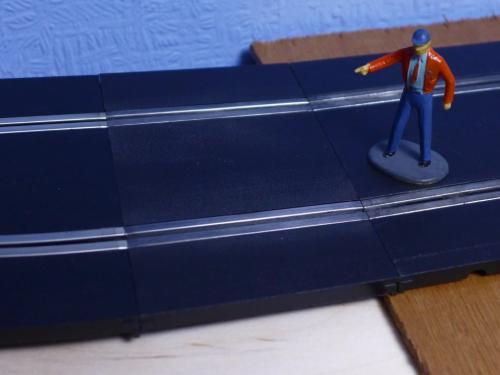
       

To help this fit into the space, I swapped an R3 for an R4 at the top 90-degree corner. That makes it slightly tighter - R2-R2-R3-R4 and into the R4 esses, instead of R2-R2-R4-R4. I've also squeezed an extra 1/4 straight into the steepest part of the hill, which smooths the gradient slightly. None of this has changed the driving very much at all. I'm pretty sure I now have the track as I want it for driving and to give space for scenics.

Most of what I've done the past month or so is electrics - routing all the power and data cable straight down through the road-bed; building a box for the Arduino that sits out of the way (no longer in a drawer) and building some road-side start lights that are controlled via the Arduino. This is how they work...


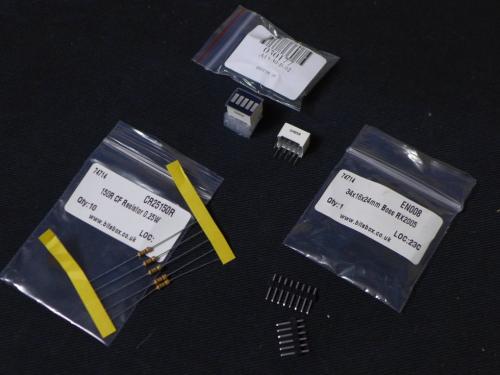
The parts list is:
  • 5-Segment Red Bar LED Display for Arduino here
  • 5 x 150R 0.25W resistors
  • Plastic box 34 x 16 x 24mm
  • Cat 5 cable (4-stranded pairs)
  • Heatshrink tubing
  • Header strip connectors (cut to 5 segments + 1 segment)
   

This is the diagram I used, which is in the 'Arduino Uno and Race Coordinator' pdf that is bundled with RC...
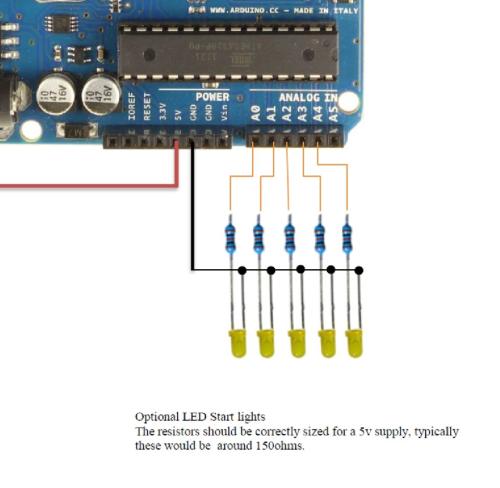
   

I bent the -ve pins together on the bar LED module and soldered a common ground wire to them - and this went direct to a GND socket on the Arduino, soldered to a single segment of the header strip. Each of the +ve pins had a separate wire soldered to it - and each went to the designated 'analogue in' sockets on the Arduino (A0 to A4), via a resistor and the header strip. This was quite fiddly - I ended up using the heatshrink on the end of the Cat 5 strand and over the resistor and then soldering 3mm of exposed resistor leg to the header strip. Flux and a low temperature iron was required.

It works nicely - three bars default (pre-race, yellow flag, end of race), then the countdown - and everything off when the race is running. I was going to start the box upright, but I prefer it lying down - and it's much easier to fit everything in the box like that! I've also changed my driving position to where I can admire the lights.
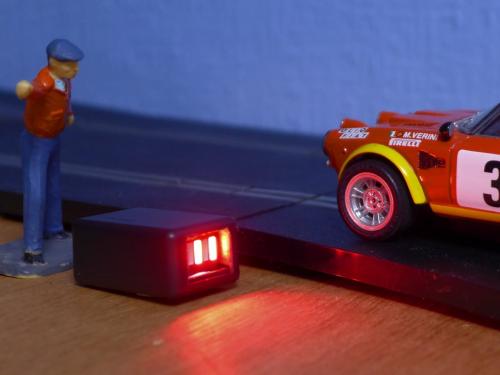
   

This month, I want to finish strengthening the road-bed and constructing the removable section for the lower loop. Naturally, I have been spending a lot of time mulling over scenery - and keep simplifying my original plans. There's a lot I like in this video...


My target is to have a week focused on starting the broad strokes of the scenery between Christmas and New Year - and then work on the detail at my leisure.

[+] 6 members Like woodcote's post
Quote


Possibly Related Threads...
Thread / Author Replies Views Last Post
Last Post by JasonB
13th-Mar-23, 12:46 PM
Last Post by 964rh
16th-Apr-21, 06:27 PM

Forum Jump:


Users browsing this thread: 1 Guest(s)