

12th-Sep-24, 12:45 AM
Still learning this process as very new to resin printing, but seemed to have had good luck in the choice of printer being very easy to use.
The unpainted body has more of a yellow tint as it has over cured - this was before I did the wonderful Cones of Calibration which reduced the exposure time per layer from 2.5s to 2s. This gave me much more accurate prints, saved a bunch of time, and for the clear resin took away some of the yellowness.
I printed a couple of smaller versions while I was trying to fix some errors in the model itself, and also tried to dial up the fineness of the print. My thought being a finer print may get clearer results.
I went from a layer height of 0.05 to 0.02 as a compromise between wating to see increased smoothness ad the time it would take to print.

While this has increased the smoothness of the print, it has also introduced some yellowing. I am assuming this could be a result of the increased uv exposure when printing as previously printed layers still receiving exposure from the current layer printing? But if that was the case, should't I see a colour gradient from the first layer printed through to the last?? My brain itches.
I think the post print process should also improve the look. At the moment just testing and you can see I did absolutely no prep work when painting. Just cleaned parts and set about it. Some fine sanding of the parts I think will improve it too.
Finally I am also testing various clear coats I have to compare the results.
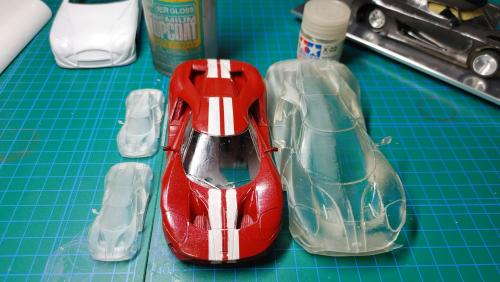
The painted car was sone with Mr Hobby Premium Top Coat. The misty side of the unpainted car just one coat of Mr Hobby to protect and the glossy side Tamiya x22
The unpainted body has more of a yellow tint as it has over cured - this was before I did the wonderful Cones of Calibration which reduced the exposure time per layer from 2.5s to 2s. This gave me much more accurate prints, saved a bunch of time, and for the clear resin took away some of the yellowness.
I printed a couple of smaller versions while I was trying to fix some errors in the model itself, and also tried to dial up the fineness of the print. My thought being a finer print may get clearer results.
I went from a layer height of 0.05 to 0.02 as a compromise between wating to see increased smoothness ad the time it would take to print.
While this has increased the smoothness of the print, it has also introduced some yellowing. I am assuming this could be a result of the increased uv exposure when printing as previously printed layers still receiving exposure from the current layer printing? But if that was the case, should't I see a colour gradient from the first layer printed through to the last?? My brain itches.
I think the post print process should also improve the look. At the moment just testing and you can see I did absolutely no prep work when painting. Just cleaned parts and set about it. Some fine sanding of the parts I think will improve it too.
Finally I am also testing various clear coats I have to compare the results.
The painted car was sone with Mr Hobby Premium Top Coat. The misty side of the unpainted car just one coat of Mr Hobby to protect and the glossy side Tamiya x22
My DIY projects and failures at https://dazee-projects.blogspot.com/
Various projects and videos at https://www.youtube.com/@DaleChan-nel
![[+]](https://slotracer.online/community/images/bootbb/collapse_collapsed.png)