Floor Plans

This button opens the floor plan editor from the track editor. Use the floor plan editor, to create floor plans, save and recall them. Floor plans are then inserted into the track editor and can be moved there.
This way you can check how to fit certain layouts in the space available.
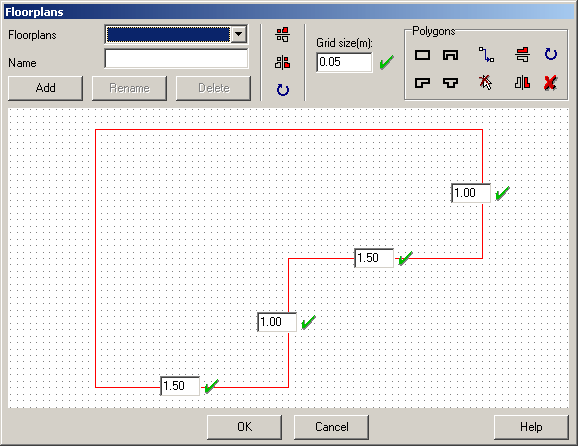
On the top left of the editor there are the functions to build the floor plan. A click onto one of the first four symbols adds a new floor plan element with the shape shown on the button.
You can alter the length of the sides of the polygon by typing in the new value and by pressing the green symbol next to the entry-fields. Please note that not every side has it´s own entry-field. If you change one value you will notice that other sides are changed as well so the shape always stays orthogonal.
To move floor plan elements, press the upper middle symbol. The entry-fields disappear and the corner points of the polygon become highlighted instead. The element may now be moved by clicking on any of its points and by dragging it into it´s new position. To again be able to select other polygons, simply click on the move-button again.
The lower middle symbol removes the selection so the complete floor plan can be viewed without any entry-fields.
On the far right there are some functions for flipping, rotating and deleting individual elements of the floor plan. Again, rotating is done in clockwise 90°-steps.
On the right to these buttons there´s a possibility to alter the snap-distance. The various elements of a floor plan can be moved in any direction in steps defined here.
To alter the distance simply type in the new value and press the green symbol on the right of the field.
The three buttons in the upper middle of the editor are used for flipping and rotating the whole floor plan. Rotating is done in clockwise 90°-steps.
There are functions for saving, loading and deleting floor plans already designed. To add a new floor plan, type in the name and press “Add”. The current floor plan is then saved with the given name. To rename an already existing floor plan, get the floor plan from the list, type in the new name and press “Rename”. Use the analog procedure to delete a floor plan from the list.
Please note that floor plans are part of a track layout, so the functionality described so far does not have to be used until floor plans are to be copied from one layout to another.
It is also possible to crearte a new floor plan without adding it to the list of floor plans. Just press “OK” to exit the editor and the current floor plan is being copied into the track editor.
There are two possibilities to end floor plan editing:
„OK“: The current floor plan is copied into the current track layout.
„Cancel“: The floor plan in the track editor stays untouched but changes made to any saved floor plans are preserved.
Some examples of how to use the floor plan editor:
1: Add a floor plan to an existing track layout.
Start the track editor with the track layout to change, open the floor plan editor.
Create a floor plan using the functions on the top right of the floor plan editor.
Press „OK“
The floor plan is copied to the track editor and may be moved there.
2: The floor plan from Step 1 is to be copied to another track layout.
Start the track editor with the track layout that already got the floor plan, start the floor plan editor.
Type in a name for the floor plan and press „Add“, exit the layout editor by clicking either „OK“ or „Cancel“.
Start the track editor, this time use the track layout to which the floor plan is to be added to and start the floor plan editor. Select the floor plan from the list [Select floor plan]. The floor plan is copied and may be moved.
3: Alter an existing floor plan.
Start the floor plan editor, select the floor plan to be changed.
Update the floor plan.
Add the floor plan using the same name as it had been saved before.
Please note that you have only altered the floor plan´s saved „version“. Track layouts that use this floor plan are not updated automatically.
Created with the Personal Edition of HelpNDoc: Single source CHM, PDF, DOC and HTML Help creation